Tools Needed:
This step will require some special tools – if you plan to tackle another restoration in the future, it’ll be nice to have these tools in your arsenal. If you can afford higher end tools, don’t skimp on these because they will be used throughout the project:
- Welder – get a decent welder or borrow one from a friend (for welding in the jack supports). I have a simple flux core wire feed welder that I use for all the sheet metal work – it’s not ideal, but gets the job done. It would be nice to have something better, but they get expensive quick. Of course you’ll also probably want a welding helmet, some dikes/wire cutters, and welding hammer and gloves too.
- Angle Grinder with attachments – an angle grinder is one of the tools I use the most – whether using a cutting blade, wire brush wheel, flap disc, or grinding wheel – you can’t get by without one.. or at least I wouldn’t want to try getting by without one. I have a couple cheap-o grinders that I use all the time. Stock up with a few wire wheels, cutting wheels, and flap discs because you’ll use them. For this step, I use the wire brush and grinding wheel attachments.
- Vice grips – I bought a few different vice grips which I also use all the time – get some with a long reach, some with short reach, wide reach, and any other reach you can think of. Something you can use to clamp parts as you weld them so you have a hand free.
- Drill and bits – I used my battery powered drill and a pilot bit (small) and a 1/4″ bit for creating the wholes for the plug welds.
- Tape Measure – having a tape measure or two or three is always handy. For this step it’s very important to compare your measurements before welding in the new pans.
- Miscellaneous – In this video, I also use a tap and die set because I had some body mounting bolts that broke off when taking the body off. Of course, if you didn’t break any bolts, this isn’t necessary. I also have a pad of paper and pencil/pen that I have measurements of the old pan written down on.
Materials/Products Needed:
The only extra product I needed for this step was the phosphoric acid which I coated the pan with as the last step in order to keep any surface rust neutralized before I’m ready to paint.
- Phosphoric acid or metal prep – After the frame and parts were thoroughly cleaned (the hard way) – I used klean-strip metal prep to neutralize any surface rust that I wasn’t able to reach or couldn’t see.
Prepping the new pans for installation:
As you can see in the video, I already installed the driver’s side floor pan. No sense explaining/showing it twice. So in this video I show the process from the beginning to end – same process for both sides.
Measure, check, measure, check, compare:
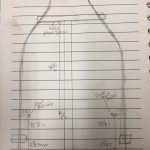 As I mentioned before – it’s very important to take all the measurements before cutting out the old pans. I drew a picture of the top and bottom of the pan and noted all the measurements – then took a picture of the measurements in case I lost the notebook I wrote them in. NOTE: in the drawing images, ‘C‘ means to center.. .not centimeters. So I took the new pan and laid it on the frame lip where the old pan was cut out from. I took measurements and arranged the pan on the lip until all my measurements matched what I had written down. I used vice grips to hold the pan in place on both ends to make double and triple sure that everything matched – there’s no going back once the welds start — at least, I really didn’t want to have to go ba
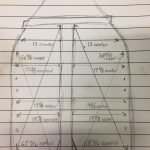 ck.
ck.
NOTE: I decided to order my pans from Wolfsburg West – and I’m glad I did. From what I’ve read, they generally have the best quality metal panels. There are a couple others that were recommended on the Samba forums, but I’ve ordered parts for my 67 from Wolfsburg West and trusted their quality and service. Accurate gauge metal thickness, and high quality molding so they fit correctly with minimal modification. With cheaper pans and sheet metal, you’ll most likely need to cut and measure, trim and fit the pans to fit correctly. The pans I fit worked perfectly with a little hammering on a couple edges to make them fit exact.
I was very happy with how well my pans fit out of the box – very little tweaking needed to get the new measurements matching the old pan measurements. Long story short – buy higher quality pans at the start to save a ton of time in the end.
Wire brush edges that will be welded:
This isn’t technically necessary, but starting welds with bare metal is generally recommended from everything I’ve read and watched. You can weld through the paint, but I always wire brush the areas where I attach the welder ground, as well as the areas that I’ll be welding (on both objects being welded – in this case that lip of the frame where the pan will sit, and the edges of the pan (top and bottom) so it’s clean metal to clean metal. Anyway – that’s what I did, take it or leave it. After making sure all measurements were correct and no additional trimming of the pan was needed, I removed the pan and brushed the edges about an inch in from all sides that will be welded.
Drill plug weld holes in pan:
The next step was drilling the holes that will be plug welded onto the frame lip. I started by measuring and marking along the sides of the pan – I measured two inches between the holes and worked my way marking where the holes needed to be drilled. Then I went back around with the punch and punched an indent to keep the drill from slipping out when drilling the holes. Then I went around with a small pilot bit to create the intial hole and back around again with a 1/4″ drill for the final holes. Keeping a 2×4 handy is helpful to drill into instead of trying to drill through the pan while it’s floating above the ground. There’s different ways to do this – with a metal punch would be ideal but I don’t have one. This is just the way I did it – to sum it up, I wanted 1/4″ holes drilled 2 inches apart around the edge of the pan where it would be welded.
TIP: something I found while welding the first pan half — I was getting very frustrated because some of my welds weren’t holding to the frame when I started. Turns out, I had drilled the holes too small — so as I was trying to weld, they were simply filling the holes without making good contact with the frame – the small holes didn’t allow enough heat and would fill the hole in the pan nicely, but didn’t make a strong weld to the frame. After reading and watching some videos on plug welds – I realized the holes needed to be at least 1/4″ for what I was trying to do. Once I re-drilled the holes, the welds worked fine. Good to know.
Measure, fit, clamp:
With the holes drilled in the pan, I re-fit the pan on the frame lip and measured, and adjusted until the new measurements matched the old. Once in place, I clamped the front and back again with the vice grips to keep it from moving out of position. I then made a small tack weld on the front and rear of the pan, and measured once again to make sure. All looked good, so now I could finish the welds.
Plug welding pans:
As I mentioned above – make sure the holes in the pan are big enough – if they aren’t, you’ll fill the holes in the pan fine, but won’t make a good weld to hold to the frame lip and it gets very frustrating!! So, my holes were 1/4″ and I began at one end, welded a hole, move to the other end, filled a hole, moved to the middle, filled a hole, etc, etc. I chose not to weld one at a time in a row, because I didn’t want to risk warping the sheet metal of the pan by the time I got to the end. I would weld a hole, then hit it with the hammer while it was still hot to form it into place and knock the slag off the welds as I went. Some spots it was necessary to use a stick to put pressure on the hole to make it tight to the frame lip as I got the weld into place – you can see this in the video. Be careful if you’re doing this too much because that stick will light on fire…. weird huh?
Tapping broken bolts (if needed):
I wanted to get the pan prepared as much as possible before painting, because I didn’t want to have to go back and risk scratching the frame up with steps I forgot. So I took this time to re-tap the body mounting bolts that had broken off when removing the body. All four of the bolts that attach under the rear seat had snapped off. So I started with a punch to punch a mark in the very middle of the bolt that had snapped (this is after I had already taken a cutting disc on the angle grinder and cut the bolts flush with the frame where they attached). After punching an indent in the center of the bolt, I took a pilot bit with the drill and started a hole right smack dab in the middle of the bolt. I slowly increased the size of the drills until it reamed out the width of the bolt that had snapped and I could re-tap the hole with fresh threads. I have a cheapo tap and die set that works just fine – I found a metric thread that looked right and began tapping the new hole.
I don’t do this much, but from what I know this is how it’s done:
- drill the old bolt out – starting in the very center with a punch and pilot bit, then gradually going up in drill size until the old bolt is gone (with threads maybe left over if done perfectly)
- have some all purpose oil to drop a couple drops on the hole/tap while going
- start with a drop of oil, and rotate the tap clockwise (as in tightening) until it starts to grab and turns a couple times. You’l feel the new threads being created
- then turn counter-clockwise to clean the metal from the new threads out
- then turn clockwise again a few more turns past where it grabs
- then back out again (adding oil if it feels like it’s binding too much)
- back and forth, forth and back until the new threads are smooth and easy to screw the tap in and out
Maybe there’s better ways, but that’s how I did it and the new threads turned out fine so I’m happy. I finished this step by coating the frame with some phosphoric acid to keep any surface rust at bay until I’m ready to paint. I’ll do this again before painting – basically just buying myself some time. Next we’ll be ready to paint the frame and new pans!

