Tools Needed:
The actual pan removal is pretty straight forward, but the most important thing I can say is measure, measure, measure before cutting. Once the pan is out, you have no accurate reference to the frame and where bolts should align, etc. So measure, and write down and copy your measurements.
- Tape Measure – critical for this step
- Screwdrivers – get a couple different size flat head and phillips head screwdrivers – for prying crusty pieces that are being stubborn (removing the E-brake cables, etc)
- Socket Wrenches – a basic metric socket set will do for this – nothing special, just a few different size bolts to undo the brake T fitting and other miscellaneous pieces from the pan
- Paint Scraper – I used a paint scraper to remove the tar board from the frame in order to get an accurate measurement for the body bolt holes.
- Angle Grinder with attachments – an angle grinder is one of the tools I use the most – whether using a cutting blade, wire brush wheel, flap disc, or grinding wheel – you can’t get by without one.. or at least I wouldn’t want to try getting by without one. I have a couple cheap-o grinders that I use all the time. Stock up with a few wire wheels, cutting wheels, and flap discs because you’ll use them. For this step, I used a cutting wheel to get the majority of the pan cut. (see resources page)
- Saws-all – my saws-all is embarassing, but got the job done. You don’t need much, but it is a good tool to invest in if you have the money. (see resources page)
- Hammer and punch (if necessary) – I needed the hammer and punch to remove stubborn brake clamps to the frame. If they’re not stubborn, a pair of pliers will do.
- Compressor and air chisel – for removing the old pan remnants from the lip of the frame, I used an air chisel. This is the easiest way, but I’m sure it could be done a harder way manually.. you choose.
Preparing to remove the pans:
Before removing the pans, I wanted to remove all the miscellaneous pieces still attached to the pan. I wanted it down to the frame and pan only, to avoid accidentally cutting a cable, or tripping over dangling parts. So I began removing what was left including:
Clutch and accelerator cables:
Since I had already removed the transaxle and pedal assembly, the clutch cable and accelerator cable were just left dangling and I wanted them out of my way. The only key to this is remembering which tube they come out of the tunnel – just take a picture or make a note of which cable goes where. Otherwise, it’s just a matter of peaking into the tunnel next to where the pedal assembly came out (or shining a light down the tunnel from the front access panel) and making sure they aren’t hung up on anything. Then just slowly feed them out from the back of the tunnel until they are completely free – wind them up and zip tie them to put away until it’s time to re-install them. Easy peasy.
Brake hoses, lines, and T-fitting:
Knowing that I will be painting the frame later, I also wanted to remove the leftover brake hoses and lines and T-fitting. The only tough part about this step is removing the little clamps that hold the flexible brake lines to the frame – especially if they haven’t ever been removed. Mine were seized onto the frame and refused to budge. I hit them with PB Blaster several times and then put my punch and hammer to work. I placed the punch on the outer lip of the clamp (they have a curved edge on one side) – then carefully hammered in a direction that would move them away from the bracket that is attached to the frame (the clamp holds the flexible line onto the frame bracket). It took some doing, but eventually, working the clamp back and forth with the hammer and punch, they freed up enough to give them a final tap to pop them off. After those clamps are free, then I could simply remove the remaining brake lines with a couple sockets and screwdrivers as needed.
Removing E-brake cables:
The emergency brake cables were in pretty rough shape in my case – one had sheared off on the end inside the rear drum, and I decided to replace them both. Even if I didn’t plan to replace them, I would still remove them to get them out of my way and clean/grease them before re-installing. There’s not much to removing them. Again, I peaked down the hole where the E-brake had already been removed and made sure they weren’t hanging up on anything. I removed the nuts from the end near where the E-brake handle would be, and slid them out through the back of the tunnel. Remember to take note of the tubes they come out of the tunnel in – take a picture or make a note.
Remove tar board from frame:
To get an accurate measurement of the body holes in the pan, relative to the frame, I thought it would be best to start with a clean slate. I took my paint scraper and removed all the tar board from the tunnel – since it was old and brittle, it sometimes chipped off in small annoying pieces, and some pieces came off as big chunks. Eventually the tunnel was down to metal and I could get a good measurement knowing that the measurement wouldn’t change later by the time I was ready to weld in the new pans.
Taking measurements and cutting out the pan:
This is the critical step before removing the old pans! Take more measurements than you think you’ll need, because once they’re out, there’s no going back. You need to get an accurate measurement of where the bolt holes, seat belt holes (if you plan to use the pan installation type – which I’m not, but still took measurements), and any other piece of the pan relative to the frame that you think you’ll need. This could also include where the seat attachments will go if you don’t already have them welded in the pans, etc. I’ll just say I’m glad I bought pans from Wolfsburg West with the seat attachments already welded into place. If you didn’t make sure you know where those new seat attachments need to go!
Draw a picture:
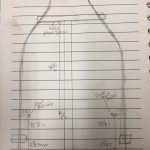
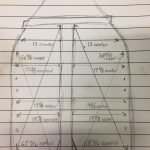
I first started by drawing the pan on a piece of paper. A rough drawing of the shape of the pan and all the holes in the pan in relation to the frame. I took a few pictures of my drawing to store on my phone in case I lost my notebook. Now I’m ready to cut out the old pan. NOTE: in the drawing images, ‘C‘ means to center.. .not centimeters.
Your drawing doesn’t need to be perfect, but you need the basic shape of the pan, and the correct number of body bolts drawn along the outside of the pan. These need to be right; otherwise, the new pan holes won’t line up when you go to put the body back on. That would be bad, right?
Cutting out the pan:
I found it easiest to cut out the pan with the frame and pan upside down, so I wouldn’t have to work around the frame tunnel on the top side. With the pan flipped over, I began with the angle grinder and cutting wheel – starting toward the middle on the edge near the tunnel. I worked my way along the lip of the underside of the tunnel, making sure not to cut into the actual frame, but using it as a guide for the cutting blade to follow. I got as far toward the rear of the chassis as the cutting blade could reach – the floor pan lowers where the battery tray(s) are, and I wasn’t able to get the cutting wheel down in those sections. I then switched to the saws-all to cut where the cutting wheel wouldn’t reach.
I moved around all edges where the pan meets the frame and cut until I reached a corner – I left the corners attached with a small (1/4″ or so) piece so they wouldn’t just fall through before I was finished. The final step, after all edges were cut through, was to go back and snip those final corner pieces that were still attached, so the pan could fall out.
When cutting the pans, leave a small piece uncut on the corners, so the pan won’t fall before you’re done cutting all edges. After all edges are cut, snip the pieces in the corners as the last step, so the pan will fall out in one piece.
Cleaning the frame after pans are removed:
After the pans were out, I went back with the angle grinder and wire brush to clean the frame on the bottom side the best I could, preparing for the next step of primer. I then flipped the pan over. A helper would’ve been nice, but was able to flip it by myself since I could get a good hold on the tunnel and flip it with the pans out of my way. With the pan right side up, I could see the left-overs of the pan that were still welded to the lip on the frame – that needs to be removed before installing the new pans.
Technically, you could weld the new ones right over where the old pan sat, but I wanted to do it right. I used the air chisel and found a place where I could get the chisel between the old pan and frame lip and started chiseling the old pan remnants off the frame lip. It comes up pretty easily once it’s started – just angling the chisel to break the old welds, and the old pan left-overs will curl right up as you go as seen in the video.
There were a couple tough spots where I used the angle grinder with the cutting blade to cut the weld, but in general, it went smoothly.
Now with the old pans out, I can start cleaning up the frame to prepare for the new pan installation.

